THE GLUTES ARE THE BIGGEST MUSCLE GROUP IN YOUR BODY, SO IF YOU CAN GET THEM WORKING WELL, YOU’LL BE A FASTER RIDER. HERE IS SARAH HUNTER’S BUTT BUILDING WORKOUT.
A COMMON PROBLEM FOR MANY cyclists is that their glutes do not work much, or sometimes not at all during the pedal stroke. Instead, the quads, and to some extent, the hamstrings do all the work, while the most powerful muscle group is laying there dormant, like a V8 supercar in storage. We need to find the key to unlock the storage and get that V8 firing. Before we start here is a quick butt anatomy summary. There are actually three muscles in the glutes:
- GLUTE MAXIMUS – makes up most of the muscle bulk in your butt. It is regarded as the strongest muscle in the body and it is the strongest of all three gluteal muscles. Standing up from a sitting position, climbing stairs, and staying in an erect position are all aided by the gluteus maximus. In cycling, the glute maximus provides the power to the push phase of the pedal stroke (from 12 o’clock to 4 o’clock).
- GLUTE MEDIUS – sometimes referred to as the upper glutes, it sits as a deep layer of muscle beneath the glute maximus.
- GLUTE MINIMUS – this is the smallest of the three muscles and is located even deeper directly beneath the glute medius.
The glute medius and minimus essentially perform similar functions, moving the leg in and out to the side of the body. In sport, the main purpose of these two muscles is to stabilize the leg during one-leg activities. In cycling these two muscles play an important job in keeping your knee tracking correctly and not caving in towards the top tube.
There are four common reasons why your glutes might not be working for you on the bike:
- Tight or shortened hip flexors.
- Excessive sitting.
- Injury or pain.
- Inactivity – fail to use a muscle regularly and it will stop working properly.
At this point you may be thinking, oh dear, this doesn’t sound good, what can I do? In this article, we are not going to dive in to why they are not working, but rather how we can get them working for you and therefore becoming stronger on the bike as a result. The only caveat being that if there is any pain when doing these exercises, then stop (note that is the case for all exercises, and note that pain is different from discomfort).
1. Glute Bridges
Basic Glute Bridge
Lay on your back with your knees bent, feet hip-width apart and toes pointing forward. The closer your heels are to your butt, the more you will isolate the glutes, the further away your heels are from your butt the more you will use your hamstrings as well. Start the exercise by driving straight up through your heels to raise your butt off the floor until your shoulders, hips, and knees are in a straight line. Keep your head on the floor. Pause for 1-3 seconds at the top of the movement before lowering back towards the ground.
Tip – really try to initiate the movement with your glutes (you should feel them working) and do not over arch your back. Concentrate on making sure your knees do not cave inwards, and also concentrate on keeping the abs engaged, this isn’t a passive exercise, you need to try to make the mind-muscle connection and feel your way through this exercise. Aim to complete 10-12 reps.
The mini band glute bridge is a more intense version of the basic glute bridge and is a great exercise if you have stubborn glutes that don’t want to engage. The mini band can be placed either just above the knees (I would recommend you start with this variation) or just below the knees (this variation makes the glutes work even harder). Press your knees out against the resistance of the mini band to keep your knees in line with the hips and ankles. As before, the same movement patterns apply in this exercise as the basic glute bridge. Once you have the basic glute bridge nailed, you can progress to a more challenging version on one leg.
The single leg glute bridge – the key to this exercise is that the hips must stay level. If you cannot hold them level then take a short rest and start again.Keep the foot of the elevated leg flexed (pull your toes towards shins).Keeping both thighs level, drive through your heel of the supporting leg, trying to keep your hips level. Pause at the top of the movement momentarily before lowering back down (under control). Do not let the butt relax or touch the floor before going again.

2. BENCH SIDE LYING HIP ABDUCTION
Doing side lying hip abduction (or side leg raises) is a great way to train your glute medius and minimus, which are your stabilizing muscles. Doing this exercise on a bench (rather than the floor) allows for greater range of movement to make the exercise more challenging. Experiment with toe position, you are looking to feel the exercise in your side butt muscles and not your quads. I like to rotate my top foot so that my toes are pointing slightly toward the floor for maximum butt engagement! To start, lie on a bench propped up on your elbow, with your elbow directly underneath your shoulder and with your hips stacked (you should neither be leaning forwards nor backwards). Raise the top leg as high as you can before bringing it back down towards the ground. Note that there is no pause in this exercise, it is a continuous movement. Aim to complete 20-30 on each side.

3. MINI BAND SEATED HIP ABDUCTION
Start by sitting on a bench (or a chair will also suffice). Place a mini band just below your knees. With your feet hip width apart, push your knees out against the resistance of the band. This is a continuous movement exercise, so once you have reached maximum abduction then return back to the starting position under control. Do not let the tension in the band slack off in the starting position before repeating the movement again.It is ok for the inside of your feet to externally rotate off the floor. Experiment with your body position in this exercise. You can sit tall and upright, or lean your torso forwards slightly (keeping a neutral spine and not slouching) or lean back slightly. You may find that one position works better for you than another. You should feel this in your glute medius and minimus (side of butt). Start with 20 reps in the position of your choice, through the weeks you can build to a set of 10 reps leaning forward (slightly), 10 reps sitting tall, and 10 reps leaning back (slightly).

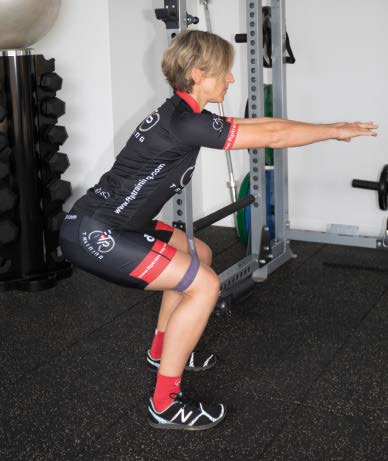
4. MINI BAND SQUATS
Place a mini band just above your knees. The mini band forces you to spread your knees apart when you squat. This should allow you go deeper into the squat position without rounding your lower back. It also activates your glutes, engages your hip rotators and takes pressure off your knees. Stand with your feet about hip width apart with toes pointing forwards. Press your butt back as you start the squat, really focus on driving the butt back and hinging at the hips. Remember to constantly drive your knees out against the pressure of the mini band. You will need to extend your arms in front of you to counteract the weight of your hips going back. Keep your spine neutral(maintain a slight arch in the lower part of the spine), chest proud and shoulders back the whole time. When you get to a point at which you feel you cannot go any lower without your lower back rounding, hold this position for 3 seconds, before driving up through your heels to standing tall. Use the 3 seconds at the bottom of the movement to really engage the mind –muscle connection and think about your position. Are your knees tracking above your feet (and not caving in?) Are your hips back far enough? Have your knees travelled too far forwards (you should be aiming for near vertical shins). Is your chest proud? To get the most out of this exercise I would recommend doing it in either bare feet or minimalist shoes. You are able to feel the floor and get correct foot mechanics.
Aim to complete 6-8 reps. As you get stronger you can progress to a thicker mini band.

This article originally appeared in Bicycling Australia Magazine


