Deny and avoid it as you may, but the fact of the matter is that cycling at your highest level requires recruitment and training of not just your leg muscles. Yep, a stronger core can improve your ride significantly. Here, I’ve detailed your new core regime below…
Your core is a complex group of muscles that goes way beyond your abs. Basically, you can think of your core as everything except your arms, legs, and head.The core provides movement in a three-dimensionally plane and many of the core muscles are hidden below the exterior muscles that most people train when doing ‘ab workouts’. The advantages of having a strong core go way beyond having a chiseled six-pack:
- Power generation. In order to generate maximum amount of power on the bike the pelvis and spine need to be stable. Strong core muscles will allow you to put more power into each pedal stoke whilst keeping your hips from rocking excessively. The core muscles themselves are not the power generators, they help effectively transfer the power.
- A strong anterior (rear of body) core is very important in preventing back pain. These muscles help protect the lower spine during all types of physical activity.
- A strong core will help keep a good posture. Strengthening the core muscles plus strengthening the glutes and stretching the hip flexor muscles will go a long way to undoing the potential postural problems that arise from sitting at a desk all day and then riding your bike all weekend.
Here is an intelligent core workout which does not place an undue amount of twisting or crunching on the spine. Most of the time during athletic movements the core is resisting motion rather than producing it, so let’s train it that way.
This workout you can complete at home with minimal equipment – the Pallof press requires a resistance band, the other exercises do not require any equipment. The focus in all of these exercises is stability, focus on the task in hand, making sure the mind remains centered on keeping the core engaged.
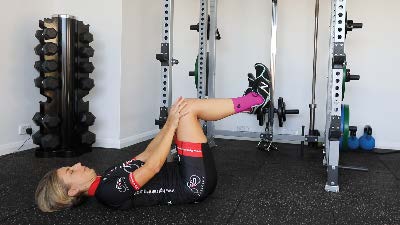
1. DEAD BUG
Lie of the floor and bend your knees to approximately 90 degrees.To activate the core, tuck your ribs in (imagine you are trying to shorten the distance between your lower ribs and your pelvis) and brace your core – bracing your core should feel like you are pulling your belly button down towards your spine.
As you do this you should feel your back flattening against the floor – your back must stay in this position during the duration of the exercise. Place your hands on to the top of your thighs and gently push your knees into your hands.Now slowly extend one leg out towards the floor, return the leg to the starting position and repeat on the opposite side. If you feel your back is no longer flat on the floor then take time to reset before starting again.
If you are doing this exercise correctly it feels much harder than it looks.Repeat for 45 seconds building to one minute as you get stronger.
Variations/ progressions:
Once the basic dead bug has been mastered you can move to a more advanced version where the opposite arm and leg move at the same time. In this version, the arms are positioned directly above the shoulders.

2. PALL OF PRESS
This is an anti rotation exercise. You should feel that the band is trying to pull your body towards it, and you must resist this unwanted movement by using the internal tension of your glutes, abdominal muscles and to some extent your shoulders.
Note that the band needs to be a light resistance band, either a Small or XS small iron edge band or something similar.Attach the band at chest height to an immovable object.
Your stance should be just wider than hip width, chest out and shoulders back. You should have a slight bend in the knees and your hips pushed back slightly.Step away from the point of attachment so there is some tension in the band. Fully extend the arms and pause for a count of two seconds and then return to the starting position. This should be a controlled movement.The narrower the stance the harder the exercise becomes.
If you are feeling this in your upper body more than your core then you have too much tension in the band, so move slightly closer to the attachment point.
Repeat for 10 reps, before switching to the other side. Building to 15 as you get stronger.
Variations/ progressions:
The split stance Pallof press also combines hip stability. If you do this variation complete 5-6 reps with left leg forward and 5-6 with the right leg forwards then switch sides and complete the same with the other side of the body.

3. PAUSED BIRD DOG
The bird dog exercise challenges the anterior (rear of body) core muscles. Start on all fours, making sure your hands are directly under your shoulders and knees directly under your hips.
Do not lock your elbows out, rather maintain slightly ‘soft’ elbows. Also focus on trying to get an even weight distribution in your hands, aim for an even distribution of weight across your entire palm – this is not as easy as it sounds!
Start the movement by straightening out the right arm level with your shoulder and the left leg level with your hip, pausing for 5-8 seconds in the extended position.When you first start doing this exercise I suggest you position yourself in front of a mirror so you can see your spine alignment and be able to adjust as necessary.
Once you have the fundamentals dialed you can up it a level – enhancing muscle contraction (and making it a lot harder) clench the fist of your extended hand and flex your foot of the extended leg so you draw your toes back towards you.
You are aiming to keep a neutral spine position during the duration of the exercise. Start with 10 bird dogs in total, working your way up to 20 as you become stronger.


4. McGILL SIDE PLANK
This version of the side plank comes from Dr. Stuart McGill who is a Professor of spine biomechanics in Canada. The main difference between this side plank and the regular side plank is:
- The foot position – note that both feet are on the floor. This helps to unload the pressure on the lower spine as compared to the traditional method of placing one foot on top of the other.
- The position of the upper arm. Placing the upper arm under the rib cage helps get the ribs into the correct position and also places more tension on the oblique muscles.
The elbow on the floor should be positioned directly under the shoulder.Drive your hips up from the floor to form a straight line with your body from head to toe.Tighten your abdominal muscles, glutes and quads.
Hold this position for 20 seconds on each side to start with. As you get stronger you can progress to 30-40 seconds.

This article originally appeared in Bicycling Australia Magazine.


